Colour Match Your Room With Laminate Flooring

How To Repair Damaged Laminate Flooring?

Whether it is for your home or for an office space, laminate flooring is often seen as a durable yet inexpensive option.

When correctly installed and properly looked after, laminate floors greatly enhance the look and feel of a room and can last for many years. However, even the strongest and most hard wearing materials can get worn and damaged over time. High traffic as well as pressure can cause wear and heat and moisture can create damage.

The following article looks at maintenance tips to help you prevent damage and keep your laminate in the best possible condition. In the event damage is more serious we will look at whether the laminate floor can be repaired or if it should it be replaced.

Scratches and chips

Scratches and chips caused by heavy traffic, household pets or items being dropped on the floor should be repaired as soon as possible. Using a laminate repair kit can help prevent scratches and chips from becoming larger and more visible.

How to prevent them?

While you may not be able to completely eliminate normal wear and tear that can cause minor damage, there are a number of things you can do to help prevent scratches and chips. For example use furniture pads under the legs of furniture pieces, don’t wear heels or heavy shoes on the laminate, keep pets claws trimmed, place mats or rugs on heavy traffic areas.

How to repair?

Purchase a laminate repair kit that matches your flooring and follow the instructions that come with the kit. Most kits will instruct you to apply the putty or wax over the scratches, then wipe away excess product and buff the edges to smooth and blend in with the rest of the floor.

Moisture damage

Moisture damage can be caused by water leaks from household appliances, spills, improper cleaning methods, house pets, relative humidity, building or plumbing leaks and flooding.

Damage caused by excessive moisture can include cupping or concave bow, convex bow or doming or any other warping or lifting and may unfortunately require the affected  laminate planks to be replaced.

How to prevent it?

While accidental spills or leaks are sometimes unavoidable, there are a few things you can do to reduce the likelihood of damage caused by moisture.

  • Ensure appliances are well maintained and replaced if they leak
  • Maintain household plumbing
  • Reduce humidity wherever possible
  • Follow the manufacturers’ recommended cleaning methods.

How to repair?

Wiping up spills immediately is probably the best way to prevent water damage. A light spill is unlikely to cause lasting damage if cleaned up and dried immediately. Don’t forget to thoroughly dry the affected area using a dry cloth and if necessary a hair dryer or fan.

For more extensive damage your will need to find out if your damaged board / boards are repairable or need replacing.
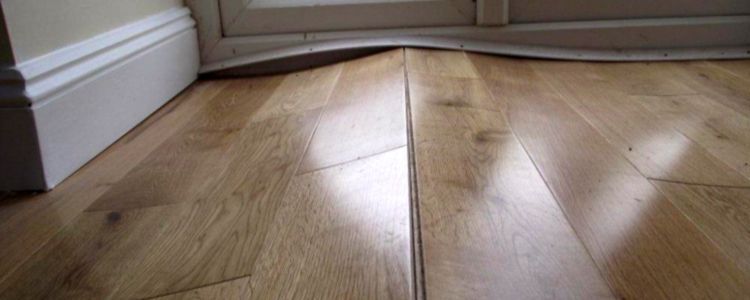
Warping

Warping usually occurs when laminate flooring does not have enough space to contract and expand with temperature changes. Which is why warping commonly occurs on boards near the wall: when the walls expand in the heat, it leaves nowhere for the flooring to go and cause boards to warp.

How to prevent it?

It’s always recommended to have your laminate flooring installed professionally. Floor installers have knowledge and many years experience in how to best install planks to prevent warping and will allow for possible expansion.

How to repair?

Moderate warping can usually be resolved without needing to remove the affected planks. It will be necessary to remove the trim and moulding and replace the spacers between the planks with smaller ones. After replacing the spacers/insertions, press the warped board / boards back into place and replace the moulding.

How Do You Fix Laminate Floor Bubbling?

Fixing laminate floor bubbling and preventing it at its earliest appearance is essential if you want your floor to last. The following are tips to fix and prevent the problem:

  • Inspect the affected area and find out if only one board is bubbling or a specific part of the floor is damaged. If only one board is causing trouble, it might be because its layer has lost cohesion.
  • Replace the wall molding first with a screwdriver or hammer and then remove the damaged board. If you have snap and lock flooring, simply lifting the affected board will be enough.
  • Replace the bubbled board with a new one. Make sure that you get the matching board or else you’ll get an uneven looking floor.
  • After replacing the damaged board, ensure that the floor is sealed to avoid moisture penetrating or direct water damage in the future.
  • If you have glued-down laminate flooring, make sure to wipe off excess adhesive after installing the new board.
  • When you have a snap and lock system, it is easier to replace and repair it. You simply remove the affected board, check the moisture level of the subfloor and check whether the locking system is firm enough.
  • If a large area of the floor is showing bubbles, the reason is inferior product. In that case, replacing the existing floor with a high-quality laminate is recommended.
  • If there are loose veneers, they can be fixed by first making them pliable. Place a moist cloth on the veneer and iron it so it becomes more pliable. Make sure it does not crack or get damaged in the process. Use a quality wood glue under the veneer and, using a clamp, press it down. Place cardboard in between the laminate surface and the clamp to prevent marring during the process.
  • Minor bubbles can be fixed by “bursting” them. Place a damp cloth on the bubble and cut a slit on the bubbled area using a sharp knife. Squeeze wood glue into the slit you have opened and press the veneer down. Place a weight overnight so that it is entirely flattened.
  • In case the bubbling occurs due to peaking, it can be somewhat flattened by placing a weight over it throughout the night. Peaking happens due to expansion, and so the edges need to be slightly trimmed to accommodate the board after the bubbling is flattened. You can also create the necessary space by removing the moulding around it.

Replacing Damaged Boards Near the Edges

Remove any baseboards, thresholds, or molding from around the area.

Start at the side closest to the damaged board or boards. Carefully pry away baseboards and molding from the wall and pry thresholds up from any doorways with a pry bar.

  • This method works when the damaged boards are close enough to the edge of the floor that it is possible to remove a small number of surrounding boards to get to the damaged boards and replace them.
  • Try your best not to damage any of the pieces that you pry away so that you can replace them afterward.

Tip: If you don’t already have a replacement board, then you can remove the damaged board first and take it with you to a home improvement center or flooring supply store to help you find a matching one.

Lift out the boards starting with the ones closest to the edge.

Insert a pry bar under the boards at their seams and press down on the end of it like a lever to pop the joints loose. Work from the edge where you removed baseboards and molding in towards the site of the damage until you can remove the damaged boards.

  • Set aside the boards that are still good, in the order you removed them, so that you can replace them afterward.

Replace the damaged board with a new one.

Line up the tongue and groove of the new board the same way as those of the board you removed were lined up. Snap the new piece into position.

  • Save the damaged board so that you can use it for future repairs. For example, if you need to match the color to repair scratches and chips, you can take it with you to the home improvement store when you go looking for the repair kit.

Return all the boards you removed to their places.

Work in reverse order as when you removed them, starting with the boards that surround the replacement board. Line up the tongues and grooves, then slide or gently tap them back into place with a hammer if there is a lot of friction.

  • If you use a hammer to tap any boards into place, use the damaged board you removed as a buffer between the hammer and the good boards to prevent damaging them.

Tack any baseboards, molding, or thresholds back in place.

Line up the baseboards, molding, and thresholds in the same order you removed them to reinstall them around the edges of the floor. Gently tack them back into place with baseboard nails and a hammer using the same nails and holes as before.

  • Use new baseboard nails if any of them got damaged when you pried them out earlier on.

The Pros and Cons of Laminate Flooring

With virtually any type of flooring, there are benefits and there are drawbacks. It always depends on what your specific needs are.

Laminate is no exception to this rule.  Some of the benefits of this type of flooring include:

  • Easy to install.
  • Low maintenance (see: best laminate vacuums).
  • Inexpensive.
  • Water and moisture-resistant.
  • Looks like hardwood or tile.

Now, you might think that with all these great benefits, what’s there not to like about laminate? Despite all its great perks, there are also a few drawbacks to this flooring:

  • Cannot sand or refinish damaged planks.
  • Sometimes slippery.
  • Can look “fake”.
  • Does not improve resale value.

Laminate flooring does one thing really well above all else: it imitates wood flooring.

Developed decades ago as an inexpensive alternative to real wood, today’s laminate flooring manufacturers have upped their game with better quality and dozens of types of wood species. You’ll find everything from American icons like oak, hickory and heartwood pine to exotics such as Tigerwood and Prado.

There are rustic and antiqued versions, too, in case you want your floor to look as if it’s been there for centuries. Plus, many manufacturers throw in an increasingly varied portfolio of stone, tile and metal look-alikes.

All this variety is due to the photographic process used to create the design layer of laminate flooring — a high-resolution image of actual wood that’s vividly realistic. The image is printed and glued to a core of fiberboard backed by a bottom layer that’s treated to prevent moisture damage. It’s all covered by a tough, clear top wear layer that resists scratches and dings.

Why And How To Have A Wedding Videographer Made Of Your Wedding Day

Mistakes When Choosing a Wedding Videographer

Not to play favorites—because we love all vendors—but your photographer is one of the most important pros you’ll have at your wedding. After all, they’re solely responsible for the wonderful wedding photos you’ll get to pore over, cherish and have as a keepsake forever.

And if you want those photos to be as perfect as possible, you’re going to want to listen to what some professional photographers have to say. Read the biggest mistakes professional photographers have seen other couples make—so you can avoid them—below.

Not Finalizing the Wedding Day Schedule

Talk to your photographer before finalizing the schedule for your wedding day. There’s a lot to consider in terms of photographing and natural light. Certain times of day are more photogenic than others (midday sun casts harsh, unflattering shadows on the face while late-day sun casts a beautiful, warm glow on everyone).

Not Sticking to the Finalized Schedule

Pay attention and respect the schedule you and your photographer discuss prior to your wedding. Being an hour late can make or break your images. Don’t just assume it only takes 10 minutes.

Not Explaining How You Like to Look in Photos

Beauty is really very subjective. I ask my clients to send a photo of themselves before the wedding that they like and one that they don’t.

Ignoring Your Budget

Ignoring your budget – there’s no denying it, wedding photography can be expensive and it can eat into your wedding budget. You know how much you can (or want to) afford for your wedding photography so keep this in mind as you research and don’t spend too long looking at photographers who are way above your budget unless you then want to have to cut back in other areas to be able to afford the photographer of your dreams. It’s easy to book, pay your deposit and just say ‘we’ll find the money’ but this can cause you a LOT of added stress later on.

Rushing your decision

Yes, photographers get booked up, sometimes a couple of years in advance but this doesn’t mean that you have to book yours within days of getting engaged. Take your time to do your research and then you know that when you do book, you’ve done everything you need to do and can be confident in your decision.

 Not checking your photographer out

Always check your photographer out. Take a good look through their social feeds, Google their names, search for their work on blogs and online, talk to past clients if you want to. The more reassurance that you can get now, the happier you can be.

Not sharing expectations in advance

A Videographer’s job is to create a beautiful memory of your day, but that does not mean they will capture footage of everything and everyone. Many couples will ask for specific shots AFTER the wedding only to be disappointed that the videographer doesn’t have it. Don’t let this happen to you!

Not considering audio

Audio is half of the viewing experience for people at the wedding and friends/family watching the video later. Despite this, audio is typically an afterthought among a sea of other things clamoring for your precious time. Good audio is almost NEVER noticed, but bad audio almost ALWAYS is. A good videographer will be prepared for every scenario, but you want to remove any surprises to make sure you receive the best wedding video possible!

It’s A Mistake To Base On The Price Alone.

In booking your wedding photographer, try to avoid making a decision based only on their rates. You must always have quality in mind since you won’t want to end up with unusable photos by the end of the event. You will only end up wasting your money by paying for the cheap wedding photographers. Keep your options open until you are certain of the quality and service of the wedding photographers. Don’t settle for a lesser price.

 It’s a mistake not to check out their portfolio.

Take the time to interview your prospective wedding photographer. Check out their portfolio to see their volume of work and find out how many weddings they have photographed. Did they produce amazing shots that inspire you? Try to determine what theme or style of photography you want for your photos and find a photographer that can achieve those goals. More importantly, make sure that you have a great rapport with your photographer. You should be able to discuss your goals and ideas freely so that you will get the results you desire.

Also, keep in mind that you will spend your whole wedding day with the photographer tailing you. It’s essential to choose a photographer that you can have a friendly relationship with throughout the process.

It’s a big mistake letting an amateur do the photography.

A common mistake that brides do is to let amateur hobbyists or volunteers do the job. The fact that the services are free might sound appealing at first, but keep in mind that just because someone has a camera does not mean they’re a qualified photographer. Although a volunteer from a friend or family is a nice gesture, don’t rely on their photography skills to give you professional quality.

Not planning group shots

In my experience the biggest headache for any photographer is the group pictures! I appreciate that for certain generations this is an important part of the day. However don’t get carried away with the number of group pictures you request. Remember the longer the photo team spend taking group shots, the less time they have creating those lovely natural images. To get around this issue we suggest a maximum of five group pictures. If you consider each group picture could take up to five minutes each to organise, you can see quickly how precious time gets eaten up.

Scrimping on a make-up artist

In my opinion, a fabulous make-up artist is worth their weight in gold. They’ll make you feel wonderful and will really add value to your images, particularly any close up shots. Make-up artists are well trained individuals but do make sure you have a trial prior to your day.

Social Media For Local Moving

MOVING GUIDE

Moving & Storage want you to understand the terms of the Moving Industry and use them as a guide to help make your move as easy as possible. For this we have created the term Moving Dictionary.

Local Move: A local move is a move within the same state. Local Moves are priced out usually by an hourly rate.

Travel Time: Occurs mostly in local moves and often times in long distance moves. It is priced from the time the truck leaves the moving companies location to the pick-up address and back from the delivery destination.

Interstate Moves: see long distance move

Excessive Carry: See Long Carry

Walk-Up Charges: Some companies charge per floor and others charge per step. Our company will only charge the customer, if the movers have to walk up above the second floor with no elevator.

Toll Charges: Customers are being charged for all toll roads. Our company does not charge for tolls.

Extra CF Charges: This is priced by the space your shipment takes up on the truck. This is usually priced by taking measurements of the shipment on the truck or by an inventory list.

Basic Liability Insurance: Moving companies have to supply a minimum insurance policy. For example, in the state of Massachusetts the insurance policy is covered $0.60 per pound.

Full Coverage Insurance: There are moving companies who allow you to evaluate your shipment and will charge to insure it. There is also a third party insurance company as well that can insure your shipment.

Long Distance Moves: A long distance move is a move from one state to another. Long distance moves are determined by volume and are priced by the cubic feet or by weight.

Intrastate Moves: see local move

Long Carry: Long Carry means the distance of the moving truck to the customer’s house/apt. The first 75 feet is free. If it exceeds, then there will be a fee for each additional 75 feet.

Shuttle:This occurs when a moving truck cannot access the customer’s street. In this situation a rental of a smaller truck will be needed. The customer will be charged for the rental truck and for the additional time taken to unload and reload the shuttle truck.

Fuel Charges: We offer competitive pricing and some of the lowest fuel charges in the industry.

A BUYER’S GUIDE FOR HOUSEHOLD MOVES

No matter if this is your first move or your fifteenth, we know that moving is inherently stressful and can be downright confusing. This guide will walk you through the top questions and concerns to ask when hiring a moving company and completing a move

encourage your questions throughout the process. Most of the professional movers you’ll meet are down-to-earth people running a family business helping people like you. You may move only 11 times in your life

Do I Need A Mover?

You may think a DIY move is for you, but there are often tips, tricks and, most important, the proper tools and equipment professional movers have access to that you may not

How much does it cost to have someone move you?

The cost to hire a mover varies based on the inventory of your move and its weight.

Movers also charge an hourly fee for labor, which includes their travel time.

How much does packing cost?

According to HomeAdvisor, the cost to pack a home varies between $270 and $2,200, with the average being $1,000.

If you’re hiring a pro to pack and unpack, the cost can run from $370 to $3,600.

Do I need insurance for my move?

The details of what your insurance covers depend on your policy. Moving and storage companies can’t sell insurance per se, but they can provide valuation options.

What Kind Of Mover Do I Need?

If you’re looking to downsize or rightsize your office, or if you’re simply changing homes, we have moving and storage services ranging from local and long distance to office and corporate relocation that depend on:

How far away you’re moving.

How many rooms you’re moving.

If you require specialty services (moving a pool table, wine cellar, gun safe, hot tub, piano).

If there is furniture that requires disassembly or reassembly at the new location.

Professional Movers

strive to be the best and most affordable moving service in the area for any need that you may have. From truck rentals to moving into your new college dorm, we want everything to go smoothly on your moving day.

highly-trained staff is dedicated to providing a successful move for each and every residential and commercial project that we take on. Whether you are buying a new house or moving into your college dorm, our full-service movers allow you to settle in with ease to wherever your new destination may be.

will even help you load and unload pods and load and unload truck rentals. If you have a storage pod that you need to get belongings from, we can unload pods as an included perk of using our moving companies for your relocation. We also offer truck rentals for our labor moving services, and our laborers can help you unload truck rentals as well.

have a full fleet of vehicles with ample room to move large pieces of furniture, accessories, and supplies to ensure that your belongings are protected when they arrive at their final destination

Moving Guide

Hiring professional moving companies takes the hassle out of relocating, allowing you to focus on enjoying your new space rather than packing and stacking boxes. Learn more about our process and how our moving company can help give you peace of mind on your moving day.

International moving guide

Moving internationally can be a daunting and complex process. There are many aspects that you will need to take into consideration to make sure your overseas removals runs as smoothly as possible, especially if you are relocating with pets and family.

A key factor to help you with your move abroad is to ensure you employ professional companies with an expertise in international moving to guide you through the procedure. Having your treasured items surrounding you can help you to settle into your new home quicker, so it is important that you find a quality firm of international movers to get your belongings safely to your new home

International Removals

Moving your belongings overseas will be a large task in itself. Broadly speaking, your belongings can travel by land, air or sea. Much will depend on where you are going, the volume of goods you are taking, and how much time you have. An experienced international removal company can advise you on the pros and cons of the various ways of transporting your belongings, and how long each shipping method will take.

The whole process will usually have to begin much sooner than with a domestic move. If, for example, your goods make up part of a container load travelling by ship, it can take weeks for your consignment to arrive at the destination country. Similarly, moving your belongings by land, even if it is just a hop across the Channel for the removal vehicle, can take a few days. As well as land and sea, there is the option of transporting your items by air. This is often the quickest option, but its cost makes it prohibitive for all but the smallest or most urgent moves.

Packing for an International Move

Deciding on what to pack for your overseas move will depend on how long you plan to stay abroad. If it’s a short-term contract or sabbatical and you plan to return within a year or so, you may be keeping your UK property and renting it out fully furnished in your absence. In this case you can probably leave personal items such as books in boxes in the loft or a locked cupboard.

Commercial Moving Guide To Business Relocations

Avoid Hidden Costs of Commercial Moving

are going at it alone, moving your office is not only stressful, it can also be quite costly. You know that there are some charges to pay when you choose to move, but are you really sure that you know everything? Too many business owners become victims of the surprise hidden costs associated with office relocation.

Office Moving and Relocation Costs

In moving your office, you need to consider having a practical move budget that can help you a lot in evaluating the costs involved with your commercial move, and be able to manage them during the process. Ballpark estimates are to be considered when making a plan for your budget.

Major Commercial Mover Services

Commercial property agent – they will search for the office space which best suits the needs of your business

Legal costs – these involve the property search charges, stamp duty, the costs and registration which the agent incurs.

Office build-out – this includes space preparation designing, setting up the new office and furnishing it. This requires consultation with a licensed construction company..

Telecom and IT – the infrastructure management includes putting in the network cable, phone & ISDN lines installation and server room setup.

Commercial moving company – the physical relocate and the relevant costs will depend on your specific move logistics, the installed furniture and the cabling within your new office space.

Decommissioning – you might be wondering what happens to the stuff you can’t move? Things like office furniture, telecom gear and cable are just some of the items that cannot be moved. A lot of organizations prefer to sell their refurbished equipment. Others choose to donate them to local schools and charitable organizations

The following are the key services that will affect the move budget:

To have a free commercial move, everything should get started early. The earlier you begin the smoother and hassle-free the moving process will be. You also need to review all of the options available for at least nine to eighteen months before the expiration of the lease. Adequate lead-time would increase the volume of competition and leverage between different options that can result to significant savings.

The Personal Injury Lawyer

When you need a personal injury lawyer and when you don’t

Some cases don’t require hiring a lawyer. If the damages are not serious and the settlement offer is reasonable, hiring a lawyer won’t make sense. But you also need to be careful when making decisions on whether to hire a personal injury attorney or not.

Some cases that should be handled by an experienced personal injury accident attorney may appear simple at first, but end up becoming complex later. Sometimes the injury may take a couple of days or even months to reveal itself. Remember, you can’t file a lawsuit twice, and the insurance company won’t agree to compensate you again. Here are some of the times you need to hire a professional personal injury attorney:

1. Multiple parties are involved

For the case of an auto accident, it might involve several vehicles and parties. In such a case, a personal injury lawyer will help you identify all the parties that share the liability of the case. The lawyer will also help you determine who among all those involved in the accident is the defendant.

2. Denied claim

Sometimes the insurance company doesn’t want to take its responsibility. If the insurance company is taking longer to compensate you or have denied your claim, you should get professional advice from a personal injury attorney. If the attorney finds out that you are worth getting compensation, he or she will help you file a lawsuit against the insurance company.

In most cases, filing a lawsuit against an insurance company without an experienced attorney on your side, you will be doing zero work. Insurance companies have lawyers who are always ready to fight for them. These lawyers know that you don’t know all your rights and some legal procedures. They will take advantage of your inexperience in legal matters to make sure the ruling will not be in your favor.

3. The insurance adjuster is offering a settlement

It is wise that you consult an attorney before accepting any settlement offer from the adjuster. In most cases, the first settlement offer is less than what you deserve. Some insurance companies use this technique to get rid of cases as quickly as possible so that they can minimize their payout.

Here are six of the most important questions to ask when you are considering hiring a personal injury lawyer:

How long have you been practicing?

At one time or another, every lawyer was brand new and just out of law school. But if you have suffered a moderate to severe injury for which you are trying to recover compensation, there is too much at stake for you to be their “guinea pig”. Ideally, the lawyer you work with should have at least a decade or more of personal injury experience. With that much experience, they will have handled a lot of cases and dealt with many of the complexities that can arise. The only way you should ever consider working with a lawyer who is young and inexperienced is if they are with a firm that is headed by more experienced attorneys. Even then, you will want to clarify who exactly will be working on your case.

How much of your practice is dedicated to personal injury law?

As we touched on earlier, there are attorneys who are “general practitioners” and those who focus mainly on one or two areas of law. A general practitioner may do personal injury along with family law, criminal law, immigration, bankruptcy, and maybe some others. Personal injury is a highly complicated area of the law that covers numerous scenarios, and it takes years to learn and understand the complexities of these types of cases. Just like you would not want a general physician to perform open heart surgery, you would not want a general practitioner attorney to handle an important personal injury claim like yours.

How much experience do you have with cases like mine?

Along the same lines as the previous question, you will want to know how much experience your lawyer has successfully pursuing cases like the one you are involved in. For example, if you were injured in a commercial truck accident, you will need to work with someone who has in-depth familiarity with the laws and regulations that govern the trucking industry, and the proven ability to recover compensation from the various parties that could potentially be at fault for the accident. Someone who has never done a case like this would probably not be a great fit for your situation.

How much personal attention will you devote to my case?

There are lawyers who have the experience and knowledge, but they may not have the level of commitment you are looking for. The kind of attorney you want is one who will give each case the attention it deserves, no matter how big or small. Find out how much personal attention they will dedicate to your case, and just as importantly, what their communication policy is with their clients. Will they communicate with you regularly? Will they give you frequent updates on the progress of your case? Will they respond to your calls, texts, and emails in a timely manner? Look for an attorney who is willing to provide a high level of personalized representation.

Are you willing to take my case to trial if needed?

This is a very important question, because there are attorneys and firms out there that never litigate any of their cases. These are sometimes referred to as “settlement mills”. Essentially, their business model is to bring is many cases as they can through the door and settle them for whatever they can get. While this might be good for them, it is very bad for you. If the other side knows that you will never go to trial, they have no incentive to offer you a reasonable settlement. Although settling the case without the need for litigation is often in your best interest, your lawyer should have extensive trial experience and be willing to try the case (if necessary) in order to recover the just compensation that you deserve.

What is your fee structure?

Most people who have suffered personal injuries cannot afford a high retainer fee and expensive hourly rates, not to mention the costs associated with bringing in outside experts when needed to help substantiate a claim. Most personal injury lawyers work on a contingency fee basis, meaning you do not have to pay any upfront fees. Instead, the lawyer is paid a percentage of the compensation they recover on your behalf.

Choosing a Personal Injury Lawyer

There are a few important factors to consider when deciding on a personal injury lawyer.

As you look at different personal injury lawyers, you should ask:

  • Have you successfully handled lawsuits similar to mine? The lawyer should show you how they have helped people who have been in your shoes before, why they were successful, and how they can use their experience to help you.
  • Are you part of a nationally recognized firm? Lawyers at national firms have access to more resources and information from all around the country, which they can use to build a stronger case on your behalf.
  • Will you work on a contingency basis? When a lawyer works on a contingency basis, you do not have to worry about paying for legal fees. A small portion of your compensation will cover the cost of retaining a lawyer — but only if your case is successful.
  • Are your clients satisfied with your work? Your lawyer will be the one who helps guide your case, and you need to be comfortable and confident in their abilities. There should be an element of trust and connection even before filing your lawsuit.

Things Personal Injury Attorneys Don’t Want You to Know

With all of the personal injury lawyer ads you see on TV, it can be difficult to know who to trust. At the Scranton Law Firm, our goal is to give you the help & information to best improve your life after an accident or injury. When choosing an injury attorney, remember these 10 things:

1. All Personal Injury Law Firms have the “No Fee Guarantee”, it is an industry standard for fee collection.  Only upon settlement are fees actually collected per our contracts.

2. Discounted fees are mis-leading, and like the old saying ….. “You get what you pay for.”

3. Small law firms don’t have the available cash for “Up-front Fees” such as court costs, investigators, Medical treatment, etc.. These costs can be $1000’s of dollar which are paid in advanced on your behalf.  Without the ability put cash upfront for your case, the case value will diminish quickly.

4. Most firms will refer your case out to other lawyers who specialize in the area of practice that fits your case, and simply take a commission for doing nothing and not performing any work.

5. Most firms don’t want you to look at their reviews on Yelp or they don’t even have a Yelp account in good standing.

 6. Everybody gives out free advice.  Most won’t tell you how to take care of your own case should you chose too.  We will provide the right information you will need if you elect to go it alone.  Although, we rarely find that people elect to act as their own attorney.

7. Everybody has an answering service that operates 24/7.  We on the other hand have associates that will follow up on calls 7 days a week.

8. There are lots of good lawyers that don’t want your case because its value is too low in their minds. We are far more likely to handle your case no matter what the value.  More importantly we have the right staff to handle it.

9. Lots of Lawyers make claims they will fight for you and yield a larger settlement. The reality is settlements are based upon what can be proven and not emotional commentary by your lawyer.

10. Lots of Law firms claim to have a large support staff … which is rarely the case.  Every case requires time and effort to get results which means you have to  have lots professional staffing to handle the mundane tasks to get the case on the fast track.  Most Law firms simply don’t have the the team it requires to get the job done.

Why is it important to choose the right solicitor?

Complex and Serious Personal injury claims involve large sums of money and can take many years to fully resolve.  It is therefore important that you have confidence in your solicitor and trust they have the knowledge and skill to get you full compensation.  The difference between a good solicitor and a bad solicitor can be the difference between winning or losing your case.  Or the difference between negotiating a great settlement or accepting unnecessary and costly compromises.  In personal injury cases, the Defendants are almost always represented by large insurance companies, who have the budget to instruct specialist teams of experienced lawyers.  They work hard to reduce the amount of compensation you receive.  You require an experienced professional to fight and win on your behalf.

Posted inLegal

A Circuit Breaker For Circuit Breakers

GUIDE TO CIRCUIT BREAKERS

Circuit breakers are not only great insurance for protecting your new motor, but they are also required by the Coast Guard for ungrounded current-carrying condutors. If a prop is caught on an underwater object (rock, log, thick weeds, etc) and prevented from rotating, the motor will respond by using more and more power from the battery in an attempt to turn the shaft. If this goes on for too long, the high level of current will permanently damage the motor, usually resulting in a completely totaled motor.

A trolling motor circuit breaker is designed to “trip” at a certain amperage, which breaks the circuit and prevents the motor from overloading and damaging itself. At between $20 and $40, they are significantly cheaper than purchasing a brand new motor! Circuit breakers come in varying amperages, and you want one that has an amperage rating (or amperage trip point) that is just above the amperage draw of your motor at max speed.

While small and medium trolling motors use a single 12v marine battery, larger trolling motors use larger 24v and 36v systems, and require 2 or 3 marine batteries, accordingly. These larger motors and multiple batteries are wired in a series pattern, and optimally, the circuit breaker should be wired within 4″ of your battery. Both the 24v and 36v trolling motor wiring diagrams are listed below along with the recommended circuit breaker. It is important to note you should never feed more voltage into a motor than what it is rated for (ie. never feed 24 volts into a 12v motor!).

Connecting Your Battery Charger

Onboard chargers are equipped with positive and negative leads for each battery. Simply wire each bank of the charger to each battery accordingly.

Safety

To avoid shorts, it’s always a good idea to keep the positive terminals covered with protective shields or proper electrical tape to prevent them from coming in contact with stray wiring, metal objects or other battery connections.

Guide to Low Voltage Circuit Breakers Standards

Low Voltage Circuit Breakers

This guide is intended as a practical guide for designers, specifiers and installers to enable them to specify low voltage circuit breakers in accordance with:

BS EN 60898-1,

BS EN 60898-2 and

BS EN 60947-2.

Miniature Circuit Breakers (MCB)

MCBs to BS EN 60898 are suitable for operation by ordinary persons and have fixed protection settings, generally a two position on/off operating handle and a performance relative to the final circuits in an electrical installation. They would normally be the final overcurrent protection measure in the electrical system, for example before sockets or lighting circuits.

Typical current ratings are from 0.5 A to 125 A. Short circuit ratings may be up to 25 kA. Performance and testing is in accordance with BS EN 60898 for domestic and similar applications categorised by the trip characteristic types B, C and D.

Moulded Case Circuit Breakers (MCCB)

MCCBs may have fixed or adjustable protection settings, normally a three position toggle operating handle giving on-off-tripped indication plus reset function, and a performance level relative to the incoming supply such that they can be installed at a point close to the supply transformer.

Air Circuit Breakers (ACB)

ACBs are normally used as the main incoming protection and have a spring-operated mechanism to open and close the device often charged by an internal motor.

Circuit breaker settings

Elasticsearch contains multiple circuit breakers used to prevent operations from causing an OutOfMemoryError. Each breaker specifies a limit for how much memory it can use. Additionally, there is a parent-level breaker that specifies the total amount of memory that can be used across all breakers.

Field data circuit breaker

The field data circuit breaker estimates the heap memory required to load a field into the field data cache. If loading the field would cause the cache to exceed a predefined memory limit, the circuit breaker stops the operation and returns an error.

Request circuit breaker

The request circuit breaker allows Elasticsearch to prevent per-request data structures (for example, memory used for calculating aggregations during a request) from exceeding a certain amount of memory.

In flight requests circuit breaker

The in flight requests circuit breaker allows Elasticsearch to limit the memory usage of all currently active incoming requests on transport or HTTP level from exceeding a certain amount of memory on a node. The memory usage is based on the content length of the request itself. This circuit breaker also considers that memory is not only needed for representing the raw request but also as a structured object which is reflected by default overhead.

Accounting requests circuit breaker

The accounting circuit breaker allows Elasticsearch to limit the memory usage of things held in memory that are not released when a request is completed. This includes things like the Lucene segment memory.

Circuit Breakers Information

Circuit breakers are automatic electrical switches designed to interrupt current flow in the event of an overload or short circuit.

Electrical circuits can experience several conditions which pose danger to associated equipment or the circuit itself, namely current overload and short circuits. An overload occurs when a larger than anticipated electric current flows through a circuit, generating excess heat and the possibility of a fire. Short circuits (which are a main cause of current overload) occur when current is allowed to travel along an unintended, low impedance path in the circuit, resulting in rapid heat buildup, explosions, and fire.

Fuses — which melt and “blow” in the presence of excess heat from overcurrent — offer effective circuit protection, but must be replaced after each circuit interruption occurs. Circuit breakers perform a similar circuit protection function but can be reset after each interruption and reused indefinitely.

Construction and Operation

Circuit breakers are typically electromechanical switches in which the circuit’s hot wire connects to both ends of the switch. When the switch is “on” electricity flows from the input terminal through the switch components and through the output terminal, completing the circuit. In the event of overcurrent the switch linkage breaks, interrupting the circuit.

When a circuit breaks, an operator must determine the source of the overcurrent and correct the problem. Overcurrent may be caused by introducing new devices into a circuit, causing an increase in the cumulative current and overloading the circuit; in this case simply removing the extra device would eliminate overcurrent. Circuit breakers are equipped with a manual actuator, so that an operator may easily reconnect the circuit and restart current flow after it has been interrupted.

Circuit Breaker

What You Will Build

You will build a microservice application that uses the circuit breaker pattern to gracefully degrade functionality when a method call fails. Use of the Circuit Breaker pattern can let a microservice continue operating when a related service fails, preventing the failure from cascading and giving the failing service time to recover.

What You Need

About 15 minutes

A favorite text editor or IDE

JDK 1.8 or later

Gradle 4+ or Maven 3.2+

You can also import the code straight into your IDE:

Spring Tool Suite (STS)

IntelliJ IDEA

How to complete this guide

Like most Spring Getting Started guides, you can start from scratch and complete each step or you can bypass basic setup steps that are already familiar to you. Either way, you end up with working code.

Starting with Spring Initializr

For all Spring applications, you should start with the Spring Initializr. The Initializr offers a fast way to pull in all the dependencies you need for an application and does a lot of the set up for you. This guide needs two applications. The first application (a simple bookstore site) needs only the Web dependency.

The second application (the reading application, which will use a Hystrix circuit breaker) needs the Web and Hystrix dependencies.

How Home Inspection Certification Can Help You

First-time buyer’s guide to a typical home inspection

First-time buyer’s guide to a typical home inspection

If you are a first time home buyer, you may be wondering what to expect from a home inspection. Home inspections are basically a part of the standard contingency for buyers so that they can be assured that their future home is structurally sound before moving in. However, many buyers underestimate the importance of carrying out a home inspection and making sure it is done correctly before finally signing the final contract. Though home inspections are supposed to protect buyers from buying a structurally faulty home, it is important to have a realistic expectation of what happens during a home inspection and what can be a possible outcome.

Choosing the right inspector

Choosing the right person to inspect your home is important. Make sure to check references before you finalize someone. One critical aspect of this is finding a neutral inspector, someone who doesn’t patronize any of the parties and gives an authentic opinion. Sometimes if the inspector is not experienced enough, they may not be able to assess the magnitude of issues that a property may have in the long term. In some provinces inspectors are regulated, which makes a seller’s job easy

Prognosis

A home inspector can give you a report card on what are the problems of a home and their seriousness. Mild warnings such as mildew may be indicated in their report. Generally, they would also do a detailed inspection of every nook and corner of your home, walls floors, etc. However, they are not permitted to break down any structures like a wall or beam to check pipes or leaks.

Why appoint a home inspector

While your real estate agent will try to close a deal as soon as possible, it is important to invest time and efforts in appointing a home inspector and getting a detailed review of your home. Only a home inspector can give an authentic report on the structural integrity of a home. Moreover, they can also give a futuristic perspective based on the present condition of a home. A home that has not been maintained correctly or is poorly constructed will have insignificant issues, which will eventually develop into bigger problems. A home inspector is likely to indicate serious problems, way before they become serious, safeguarding a potential buyer.

Generally, home inspections take around three to four hours depending on the size of a home. Inspectors examine both the interiors and exteriors of the home right from circuit panels to drainage to pipes and make a detailed report. Some of the parameters may be confusing for potential buyers and inspectors can easily address them to help a buyer understand what they are signing up for. If an inspector reports a critical observation, buyers can either back out of a sale, request resolving the issue from the seller or take the responsibility of solving an issue by themselves.

ENSURE YOUR HOME INSPECTION GOES SMOOTHLY WITH OUR HOME INSPECTION CHECKLIST.

ELECTRICAL

Check smoke alarm batteries

Replace burnt out light bulbs

Ensure electrical outlets and switches, including those in utility rooms and garages, are equipped with cover plates

Test GFCI outlets

HVAC

Have a qualified HVAC company inspect your furnace to ensure it’s operating correctly and efficiently

Replace furnace and exchanger air filters if needed

ACCESSIBILITY

Ensure free and open access to all house and garage hatches. This will avoid re-inspection at the seller’s expense

Clear spaces around electrical panel, furnace, sump pump, water heater and water softeners

Ensure closets and cabinets are unobstructed

GENERAL

Remove all pets from the property

Tighten loose doorknobs

What to Expect

The inspector will begin on the exterior of the home then move into the interior where he or she will test all components and appliances. The inspection typically lasts as long as 2 hours. Always let your inspector know beforehand if something is not working properly to ensure the inspector’s safety and minimize the risk of damage to your home.

Don’t be present during the buyer’s inspection

Attending a buyer’s inspection of your home could be perceived negatively by the buyer so it’s always a good idea to leave the property.

When You Return

Check your thermostat, windows and blinds after the inspection. These components often can be difficult to operate, preventing us from setting them to their original positions.

WHAT TO KNOW ABOUT HOME INSPECTIONS

Moving on from renting an apartment to buying a home is a big step for anyone. After the first stage of looking around and finding a home that you actually want to purchase, see how you stand out among the crowd, you will then be required to put in an offer.

Before you do, however, you will want to make sure that the home is not going to require infinite amounts of money to fix up after you have already purchased it and moved in. This will require a home inspection; one that makes sure to complete your home inspection checklist. Here to ensure you know what is involved in this process is our comprehensive guide on home inspections.

MAKE SURE THAT YOUR HIRE A PROFESSIONAL

Having a home inspection costs money, money that you can’t afford to lose because you didn’t get the right person to do the job in the first place. Don’t cheap out on a home inspector, their expertise is what you are paying for. You will want an inspector who has the proper credentials as well as some experience in the field.

Ask the inspector what associations they belong to, this is a better way that actually trying to dig into their qualifications. Once you know what associations they belong to you will get a better sense of their qualifications. (Hint, not all associations are equal, some require a minimum of training, experience, as well as educational requirements.)

And don’t go for a home inspector that doesn’t have insurance. Some will have limited liability clauses, what this means is if there any damages that occur during the inspection they will be off the hook. Here is an excellent guide for picking a home inspector. Keep in mind that choosing the right inspector is a critical aspect of a home purchase. You want someone who is thorough but also a good communicator.

Home Inspection Checklist

Real Estate Services knows that one of the most important tasks when buying or selling a home is to have complete inspections. It is always wise to make your offer contingent on professional inspections. Professional inspections can uncover areas of the house that need attention and can be taken care of before you sell or purchase a property. If something comes up that is serious, you can then have an out with your contingency.

This checklist will not replace a professional inspection, but will help you understand and uncover areas that may be of concern. This checklist will guide you through the basic inspections and help spot areas of concern before you make an offer or place your home on the market. Following the guidelines of this checklist can help you save money later.

Exterior

Grade

Grade slopes away from the house.

No standing water.

Homes at the bottom of a hill.

Water is directed away for the house.     

Driveway

Driveway slopes away from the garage.

No large cracks.

No excessive weed growth.

No heaving or uneven spots.

No potholes or missing paver stones.

Drain at entrance of garage for driveways that slope down.           

Foundation

Appears in good shape.

Foundation is above the grade.

Foundation appears straight.

No large cracks.

No crumbling.

No water stains or signs of dampness.

No moss or mildew growth.

Structure

Appears in good shape.

No rotting of the sill plate.

No missing siding or bricks.

Walls appear straight.

Roofline appears straight with no sagging.

Porch or doorsill appear straight.

Roof

Check from the ground using binoculars.

Appears to be in good shape.

No missing shingles or tiles.

Edges are not lifted.

No moss growth.

Shingles are not worn or torn.

Flat roofs should only be inspected by a professional.

Chimney

Check from the ground using binoculars.

Appears to be straight.

No large cracks.

No missing mortar between the bricks.

No missing bricks or stones.

Not separating from the house.

No black tar leaching on outside.

You may want the chimney cleaned by a professional before the sale of a home.   

Eaves troughs & Downspouts

Securely attached to the roof.

No cracks or joint gaps.

No excess chalking.

Directs water away from the house.

Have not eroded away the landscaping.

Windows & Doors

Fit well in openings.

Open smoothly with no binding.

Hardware in working order.

No rotting or missing trim.

All weather stripping intact.

No missing or broken glass.

No torn screens.

Exterior doors are solid core.

In colder climates

Insulated glass in windows and doors.

Storm doors and windows.

Garage

Concrete slab with no major cracks.

At least 6 inch concrete wall.

Door opens and closes smoothly.

Garage door opener works.

Attached Garage

Door to house closes tightly.

Door to house is fire rate steel door.

Door to house closes automatically.

5/8 wallboard on ceiling and common walls.

Top Books and Resources for Home Inspectors

Many professionals improve their knowledge and skills by reading literature relevant to their field. As a home inspector — or a home inspector to be — you can find lots of helpful and valuable information in the books and resources listed below

It’s exciting to embark on a new career, and it’s rewarding to learn the material, take the exam, pass it and get your home inspector’s certificate. But the learning doesn’t stop there. You can find excellent tips, tricks, and advice in these books that delve into everything you need to know about a home’s structure and systems.

Several are aimed more at the home buyer, in terms of how to select a home inspector and what to look for in a home, but this information is also highly valuable to the home inspector. You want to fulfill the expectations of as many clients as possible.

For our rating system, we considered the value of the information to home inspectors, comprehensiveness, and readability.

What Are The Different Kinds Of Tax Preparation

How Much Does It Cost to Get Your Taxes Done?

You can’t run from them. You can’t hide from them. But you can get someone else to do them.

Yep, we’re talking about taxes.

For those of us who would like to spend our weekends at the park with the kids or, honestly, anywhere else but at a desk with tax forms and schedules, finding a tax advisor may be our only hope this tax season.

How much does it cost to have a professional do your taxes? Let’s take a closer look and find out.

How Much Does It Cost to Get Your Taxes Done?

The average cost for a basic tax form preparation is about $176.1 That fee covers a standard 1040 and state return with no itemized deductions.

But don’t run off with that number just yet. While the national average is a good starting place, a lot of things determine the actual cost.

Here are four questions you should ask yourself as you decide how much to spend on your tax filing:

1. How qualified do you want your professional to be?

The average Joe tax preparer will charge less than a high-quality advisor with loads of experience. But when it comes to the IRS and your money, the stakes can be high, depending on your specific situation.

Now, don’t get us wrong. We want you to save money just as much as you do. But when hiring experts—like tax pros, doctors and mechanics—we’re all for spending more cash to get the job done right. Paying an extra $100-300 on the front end may be worth it in the long run if the expert is thorough, accurate and ends up saving you a ton. Remember, we’re talking about estimates here, so adjust your professional expectations accordingly.

2. How organized are your taxes?

Show up at a pro’s office with crumpled receipts spilling from your pockets and manila folders packed with unorganized records and you’ll definitely pay a high fee. Here’s our rule of thumb: The more organized you are, the less work a tax pro has to do. And that means a lower cost in the end.

3. Where do you live?

The fees for hiring a tax professional differ across the country. For instance, you can expect to pay more than average on the Pacific Coast and less in the good ol’ South.2  Here are the average tax preparation fees for an itemized 1040 with a Schedule A and state return in each region:

  • New England (CT, ME, MA, NH, RI, VT): $333
  • Middle Atlantic (NJ, NY, PA): $290
  • South Atlantic (DE, DC, FL, GA, MD, NC, SC, VA, WV): $268
  • East South Central (AL, KY, MS, TN): $210
  • West South Central (AR, LA, OK, TX): $271
  • East North Central (IL, IN, MI, OH, WI): $249
  • West North Central (IA, KS, MN, MO, NE, ND, SD): $214
  • Mountain (AZ, CO, ID, MT, NV, NM, UT, WY): $263
  • Pacific (AK, CA, HI, OR, WA): $329

You’ll notice all these averages are higher than the $176 mentioned above, but that’s because many people who use a tax pro have more complicated situations than the standard 1040 can cover. Either way, expect a slight fluctuation in cost based on the quality of the pro, the region and your specific needs.

How Do Tax Advisors Set Their Prices?

When you sit down with a tax advisor for the first time, be sure to ask how they’re going to charge you. It shouldn’t be a secret and you don’t want surprises! A tax advisor will usually follow one of these five methods:

1. They charge a set fee for each tax form or schedule.

No ifs, ands or buts about it! They have one flat fee per form or schedule. If you’re wondering what the average costs for filing common forms are, here’s the breakdown:

  • $273 for a Form 1040 with a Schedule A and state return
  • $176 for a Form 1040 (non-itemized) and state return
  • $184 for a Form 1040 Schedule C (business)
  • $124 for Schedule D (gains and losses)
  • $135 for Schedule E (rental)
  • $180 for Schedule F (farm)
  •  

2. They charge a fee that matches what you paid the year before.

If you work with the same tax advisor each year, you’ll often get a matching rate. That means your advisor will charge you what they charged the year before and maybe more if your tax situation has become more complex.

3. They charge a minimum fee plus more if your taxes are complicated.

Some advisors charge a flat fee, but if you make them think too hard, they’ll have to charge you more to compensate for their time. Definitely ask up front if your advisor has extra fees beyond the flat rate.

4. They charge a value-based fee—a price based on feeling.

Some tax advisors will say, Your taxes feel like they’ll cost $350. You can see how value-based fees can easily lead to disputes. Then again, advisors do this day in and day out and they’re used to quoting rates that match the elbow grease they’ll need to put into the job.

5. They charge an hourly rate.

If your tax advisor charges by the hour, make sure you find out how much they charge and how much time they expect to spend on your taxes. An advisor’s hourly wage can be steep—sometimes $400 an hour. But if they can get your taxes done in less time, you won’t get stuck with a high bill at the end.

Pricing Methods Used by Tax Preparers

You can ask up front how the firm determines its prices if you’re comparing tax professionals or accountants. Ask for an estimate of what their services might cost you, although you probably won’t get an answer—at least not a firm, definitive one—until you’ve met with the professional and they have a firm grasp of your tax issues.

Some accountants offer free consultations, so you might get an answer at the end of this initial meeting.

Otherwise, the firm would have to base its number on your personal summary of your situation, and this might or might not provide an accurate picture of your tax situation. After all, you probably wouldn’t be seeking a professional’s services if you were exceptionally savvy about tax matters.

Some of the methods used by tax professionals to set prices include:

  • A set fee for each tax form or schedule
  • A fee based on last year’s fee plus an additional fee for any changes in a client’s tax situation
  • A minimum tax return fee, plus an additional fee based on the complexity of the client’s situation
  • A value-based fee based on the subjective value of the tax preparation service
  • An hourly rate for time spent preparing the tax return and accompanying forms and schedules
  • A set fee for each item of data entry

Steps to Take Before You Prepare Your Taxes

Choose a Preparer

If you don’t have a tax preparer yet, a good way to find one is to ask friends and advisors (such as an attorney you know) for referrals. Be sure that the person you choose has a Preparer Tax Identification Number (PTIN) showing that they are authorized to prepare federal income tax returns.2

You should also inquire about fees, which are likely to depend on the complexity of your return. Avoid using a firm that intends to take a percentage of your refund. The IRS website has tips for choosing a preparer and a link to the IRS directory of preparers, which you can search according to their credentials and location.

Schedule an Appointment

The sooner you meet with your preparer, the sooner you should be able to complete your return (even if you decide to file for an extension, as discussed later). If you anticipate a refund, you’ll get that sooner, too. If you wait too long to schedule an appointment with a tax preparer, it might not happen before April 15, and you could miss out on opportunities to lower your tax bill, such as making deductible contributions to an IRA or a health savings account.3 4 Note: for 2020, the deadlines for making these contributions and for filing taxes is July 15.5

Gather Your Documents

By the end of January, you should have received all the various tax documents that you need from your employer or employers, as well as from banks, brokerage firms, and others with whom you do business. For each form, check that the information matches your own records.

What Happens If A Tax Preparer Makes A Mistake?

When the mistake doesn’t impact tax returns and/or refunds, you may still report the tax preparer under the following circumstances.

  • Improper use of the Preparer Tax Identification Number (PTIN) on a tax return
  • Not providing clients with a copy of their tax return when asked to do so
  • Failing to sign tax returns they prepare and file
  • Holding the client’s records until the preparation fee is paid
  • Using off-the-shelf free tax software for preparing client returns
  • Claiming to be a certified accountant, an attorney, an enrolled agent, enrolled retirement plan agent or enrolled actuary

Useful Eye Care Tips For Women Of Any Age

Warning signs of a serious eye problem

Eyes aren’t exempt from the wear and tear of aging. Some of the age-related changes in the eyes are annoying but not serious — for example, it can become difficult to focus on near objects, and eyelashes may thin out a bit. But other changes can be serious eye problems that threaten vision.

With age, the eyes’ ability to stay lubricated starts to wane. This can leave eyes feeling irritated, sticky, dry, or gritty. The lens of the eye can become less elastic. Night vision may also start to suffer, which can pose problems when driving at night. In contrast, cataracts, macular degeneration, and diabetic retinopathy can rob you of your sight.

How do you know if an eye problem is a nuisance or the start of something serious? The following signs and symptoms warrant a call to your doctor. Catching serious eye problems early can help preserve your vision. Even non-vision-threatening eye problems can be treated to keep your eyes comfortable and your eyesight as sharp as possible.

Call your doctor if you experience any of the following:

  • Change in iris color
  • Crossed eyes
  • Dark spot in the center of your field of vision
  • Difficulty focusing on near or distant objects
  • Double vision
  • Dry eyes with itching or burning
  • Episodes of cloudy vision
  • Excess discharge or tearing
  • Eye pain

Signs you might need glasses

Do you have a vision problem that could be corrected?

About 11 million people over age 12 need vision correction.1 How do you know if you need it?

Many people have lived with poor vision for such a long time, they simply don’t realize they could benefit from or see better with vision correction. Others might be aware they have a vision problem but put off going to the eye doctor until it’s a struggle to perform everyday functions. The fact is you should see your eye doctor as soon as you notice your changes in your eyesight.

As soon as you notice your eyesight is changing, it’s time to see your eye doctor

Following 10 signs you might need an eye exam.

  • Blurred close-up vision, may indicate farsightedness (hyperopia) or presbyopia, depending on your age
  • Poor distance vision, or nearsightedness (myopia)
  • Difficulty seeing objects both close up and at a distance (astigmatism)
  • Difficulty seeing at night
  • Increased difficulty adjusting from dark to light surroundings
  • Difficulty in reading or working at a computer
  • Eye strain or eye fatigue
  • Frequent headaches
  • Double vision
  • Seeing halos around light

Preventive Eye Care and Eye Examinations Are Important

Just as with annual physical examinations, it’s equally important to have regular eye examinations. An annual eye examination is appropriate for most people.

If you have glaucoma, macular degeneration, diabetic retinopathy, or a family history of eye diseases or disorders, regular monitoring and more frequent visits may be required.

It’s important to discuss your health care situation with your primary care doctor and your eye doctor and make sure you follow his or her advice about ongoing appointments, medications, and/or treatments. Prevention is an important component of eye care.

Some eye conditions and diseases are hereditary and family members may need to be monitored regularly by a general physician and an ophthalmologist or optometrist.

Other Indicators of Possible Vision Problems

Other indications of possible vision problems may include problems with the following daily living activities:

Moving Around

  • Having difficulty walking on irregular or bumpy surfaces
  • Walking or stepping hesitantly
  • Going up and down stairs slowly and cautiously
  • Shuffling the feet
  • Brushing against walls while walking
  • Missing objects by under-reaching or over-reaching

Everyday Activities

  • Discontinuing or doing certain activities differently such as reading, watching television, driving, walking, or engaging in hobbies
  • Squinting or tilting the head to the side to focus on an object
  • Having difficulty identifying faces or objects
  • Having trouble locating personal objects, even in a familiar environment
  • Reaching out for objects in an uncertain manner
  • Having trouble identifying colors
  • Selecting clothing in unusual combinations of colors or patterns

Eating and Drinking

  • Having problems getting food onto a fork
  • Having difficulty cutting food or serving from a serving dish
  • Spilling food off the plate while eating
  • Pouring liquids over the top of a cup or drinking glass
  • Knocking over glasses while reaching across the table for another item

Reading and Writing

  • No longer reading mail, newspapers, or books
  • Holding reading material very close to the face or at an angle
  • Writing less clearly and having trouble writing on a line
  • Finding that lighting that was previously sufficient is now inadequate for reading and other activities

Snake Care

SNAKES

What species of snakes are native or indigenous to PA?

Venomous

Eastern Massasauga Rattlesnake

Northern Copperhead

Timber Rattlesnake

Non Venomous

Black Racer

Black Rat Snake

Eastern Garter

Eastern Hognose Snake

Eastern King Snake

Eastern Milk Snake

Eastern Ribbon Snake

Eastern Worm Snake

Kirtland’s Snake

Northern Brown Snake

Northern Ring-Neck Snake

Northern Water Snake

Queen Snake

Red-bellied Snake

Rough Green Snake

Short-head Garter

Smooth Earth Snake

Smooth Green Snake

Do you need a permit to possess a timber rattlesnake or to keep one as a pet?

The person in possession of the snake would have to obtain a Venomous Snake Permit from the Fish and Boat Commission prior to obtaining the snake. The snake would then have to be legally collected from the wild in during the open season and in compliance with size and possession limits

A timber rattlesnake obtained from the wild in without a permit would be illegal to possess. Timber rattlesnakes may not be imported into from other states or countries. It is illegal to breed timber rattlesnakes (or most other native reptiles and amphibians) in captivity

I heard that black rat snakes and copperheads are breeding and their offspring resemble the black rat snake but are as venomous as the copperhead. Is that true?

No, that’s false. It is impossible for the black rat snake and copperhead to successfully breed. These two species of snakes have two different reproductive strategies. The copperhead give birth to live young encased in a sac while the black rat snake lays eggs which then incubate for two to three months. These two distinctively contrasting methods of reproduction make it impossible for these to species to breed.

IDENTIFY AND GET RID OF VENOMOUS SNAKES

You’ve come across a snake in your garden, woodpile, or anywhere else around your home, so the first question you need to get answered is whether it’s venomous. The second question—regardless of the answer to the first—is how to get it to go away. Good news: You don’t have to be an expert to answer either of those questions. Here’s all you need to know.

FOUR TO BEWARE OF

Let’s start with a brief clarification. Scientists and other reptile experts refer to snakes as venomous rather than poisonous. A creature (or plant) that is poisonous contains toxins that cause you harm when you bite into it. A venomous snake injects you with a toxin when it bites you.

you’ll encounter only four types of snakes that are venomous. Three of them—cottonmouths, copperheads, and rattlesnakes—are different kinds of pit vipers. The fourth is the coral snake, a colorful species that looks very similar to other nonvenomous species.

Cottonmouths are dark in color, from green to black, with vertical dark lines by each nostril. They are most frequently found around water, which is why they are sometimes known as water moccasins. They get the name cottonmouth from the bright white lining inside of their mouths, quite visible when they open it as a warning to predators. Cottonmouths are most abundant in the southeastern and southwestern United States and are known to hang around irrigation ditches, swamps, and other soggy areas. Intense pain occurs immediately with a cottonmouth bite and is accompanied by bleeding, swelling, and muscle weakness. Loss of muscle function and even paralysis can follow. Fortunately, the effects abate after treatment with an antidote

Copperheads’ bodies range from brown to bright orange and even peachy, but their heads are almost always the color of copper. Young ones typically have yellow tails. Most years, copperheads account for more bites of people than the other venomous species, but they also have the mildest venom, so those bites are almost never lethal. Pain and swelling start quickly around a copperhead bite and spread out to the limbs. Numbness, nausea, and a rapid pulse may follow. These snakes live in rocky areas near swamps, ponds, and streams, and they can be found

Snake Country Survival Guide

Worried about snakes at home? Killing or moving snakes is a quick fix, not a solution. Moving a snake far from her home may be a death sentence for her and is a temporary fix for you — where there’s one, there’s likely to be more. Learn to live safely with snakes and appreciate your encounters.

More snakes = less disease! Snakes eat vectors and carriers of many diseases, including The Plague and Lyme disease.

Snakes are effective, all-natural pest control. Snakes won’t raid your garden or chew up your wires, but they will eat the critters that do. And due to their non-competitive nature and ability to fast for long periods, vipers (rattlesnakes, copperheads, cottonmouths) are more effective at controlling prey populations than bird or mammal predators.

Still don’t want vipers for neighbors? Make friends with other snakes! Kingsnakes, racers, and other non-venomous snakes eat venomous snakes. Others, like gophersnakes and bullsnakes, compete with venomous snakes for food.

Killing or handling snakes is a good way to get bit

Most bites happen to people who try to handle or kill snakes; the rest are due to people not watching where they put their hands or feet. Once you spot a snake, the risk of a bite is virtually zero since you can keep a safe distance. Snakes presumed dead can and do bite.

Who can remove a snake from my garden or house?

A licensed local herpetologist will catch and relocate a snake for a fee. All snakes are protected and killing one is an offence. Only licensed people are allowed to catch or keep snakes.

Wildlife organisations

Wildlife organisations do not catch snakes unless they are injured or there is a serious threat. However, they can suggest ways to encourage the snake to move away.

How to deter snakes

You can make your garden less attractive to snakes by keeping shrubs trimmed, lawns mowed and the garden generally tidy. Remove any piles of rubble, wood, roof sheeting or leaf clippings where snakes can shelter.

Snakes may lay eggs in compost heaps and garbage piles. Food sources such as rodents, frogs or birds encourage them to stay, so snake-proof any refuse bins, ponds and aviaries with fine mesh. If snakes are residing under your home, consider blocking their access after they have been removed.

Are all snakes dangerous? Snakes are not naturally aggressive and prefer to retreat. They will only attack humans if hurt or provoked – most bites occur when people try to kill or capture snakes. As snakes are a sign of a healthy ecosystem it can be wiser to overcome your fears instead.

Dealing With Snakes – Safely Handling Encounters

The vast majority of encounters between people and snakes are with non-venomous, harmless snakes. It is critical that you understand that snakes aren’t “aggressive” and don’t hunt or chase people, but they can strike without coiling first. Belief in myths such as these can cause people to behave rashly during an encounter, creating an unsafe situation for themselves and for the snake. Above all else, if you encounter a snake, try your best to remain calm! Snakes would rather not encounter humans, and it is probably as scary for them as it is for you.

Outdoor Encounters

Keep children and pets away while you try to identify the snake as venomous or non-venomous – from a safe distance. Keep in mind that snakes will usually try to escape to the nearest cover, so try not to stand between them and bushes or other cover. When they’re startled, some snakes will flatten their heads and puff up to make themselves look more intimidating. A snake may also act defensive or try to strike when cornered, so give it space! Remember – releasing a smelly musk and striking are a snake’s only defenses, since it has no claws. Some non-venomous snakes will rattle their tails when they feel threatened — this can sound like a rattlesnake if they are in dry leaves.

After you identify the snake, or at least determine that it is non-venomous, the best course of action is to simply “let it be.” It will probably soon be on its way. If you feel that you must remove the snake from your yard, spray it gently with a water hose to send it on its way while keeping your distance. If you find a snake in your pool, you can use a long handled leaf skimmer to gently remove the snake, as it may not be able to get out on its own if it is small or exhausted from swimming. If the snake is venomous or you’re not sure of its identity, take a digital photograph and contact a professional! Don’t try to handle the snake yourself!

Indoor Encounters

Try to identify the snake as venomous or non-venomous from a safe distance while keeping children and pets away. Most snakes found inside Florida residences are non-venomous, and can be easily and safely removed using a large wastebasket or outdoor trashcan with a lid and a broom. Tip the trashcan onto its side, and use the broom to gently “chase” the snake into the trashcan. Then, tip the trashcan upright and, taking care to keep your hands away from the open top, replace the lid. You can then easily transport and release the snake in a nearby natural area. A full description of this technique, with accompanying photographs

You MUST check these traps every day so that trapped snakes don’t die from lack of moisture and begin to smell. Captured non-venomous snakes can easily be set free at a nearby natural area by pouring vegetable oil onto the snake to release it from the glue. If you find a snake in the garage and can’t capture it with a trashcan or glue board, simply close the door to your house and crack open the external doors to allow the snake to escape

Optimal Engine Rebuilding

How Long Should an Engine Last?

How long should an engine last? This question put up in thousands of people’s minds when they decide to purchase a motor from the market. And it must be because it is a costly product and you are investing your valuable money to earn and get its benefit for a long time as much as possible.

If you too are one in those thousand persons who are confused about this topic. So don’t worry about that as always AutoTechio is here to solve this problem. In this article, we will tell how long can it last either it is the rebuilt, new (crate), used or remanufactured engine.

Engine Lifespan

Long-time ago if we talk about 1916, at this time the engine ability was only 100 miles and after hundred years 10,000. For today’s generation cars Scholars say that nowadays the engine lifespan in a car has an average life of 100,000 miles. If you calculate it into kilometres its value will change to 160,000 km. But it is not the actual value of individual this is average and you better know that mean.

This can run up to more than this given numerical value. But it is not good to say, it will give you service for the lifetime. Because you know that very well nothing is permanent on this earth, and about other planets, sorry, we don’t know.

Yes, you can run an engine of your car more than this value. But how? Do you know anything about that? If you answered yes, congratulations, very good. And if you answered No, then ok no problem we will tell you.

As you know its average lifespan is one lakh miles but most of the engines stop working at only forty to fifty thousand and some continuously work up to 150000 miles and above. That all depends on you, its all depend on the maintenance of the engine.

How Long Do Rebuilt Engines Last?

When a car engine fails, it may be due to a single part becoming dysfunctional or broken. Engines are such delicate machines, after all, that every single part is crucial to its operation. When one part fails, the whole machine might fail.

When engines are rebuilt, a mechanic will deconstruct the engine for the sake of replacing any worn, broken, or old parts and replacing them with newer, superior ones.  While some car experts do not recommend that this be done unless the engine is almost new and only needs a few simple parts replaced, it is actually possible for an engine to be properly rebuilt. In fact, many experienced mechanics do this quite often.

A few factors determine if a rebuilt engine will be safe for driving:

  • The person who rebuilds the engine must have hands-on experience with fixing and building car engines.
  • The new or replaced engine parts must be compatible with the existing engine.
  • The engine as it is must be in poor condition or be missing several vital parts.
  • The engine must be completely compatible with the vehicle itself. In other words, you cannot install an engine built for a sports car into a car that is not built to be driven like a sports car.

How can you extend your car’s lifespan?

Want to improve your car’s lifespan and enjoy more functionality for your vehicle?

Here are a few tips to do just that:

  • Develop and adhere to a service schedule. When it comes to your car’s lifespan, an ounce of prevention is worth a pound of cure. While nobody likes spending time at an auto repair shop, arranging to be there on a scheduled and pre-set basis is the best way to avoid surprise visits. In addition to keeping you away from major repairs, regular maintenance also boosts your car’s resale value and extends its engine life.
  • Fix small problems quickly. Instead of driving around for a few thousand miles with your “check engine” light on, fix small engine issues promptly. Even tiny engine problems can become major ones if you don’t address them in a timely fashion. With this in mind, contact your mechanic as soon as you notice a funny noise, strange light, or odd symptom during your driving experience.
  • Clean your engine annually. You should clean your car’s engine at least once a year. Because dirt and grime can cause your engine to run hot, this layer of yuck puts extra strain on your car’s system and can contribute to things like overheating and a shorter-than-average engine lifespan. Adding a fuel injector cleaner is a great way to beat dirt and grime buildup.
  • Let your engine warm up. If you live in a cold climate, allow plenty of time for your engine to warm up before you drive off. Cold weather is hard on your car’s engine and can contribute to a lower-than-normal battery charge. Because of this, your car needs more energy to start the engine. Additionally, cold weather makes your car’s engine oil thick and dense, and the car needs to warm up to move it throughout pieces effectively.

How Long Do Important Car Parts Last?

Hiring a mechanic who will choose the right parts is very important. When the best parts are used, they will last longer and save you a lot of money on replacement parts and on other car problems. First, you need to know how long important car parts are supposed to last so you have a frame of reference.

Here’s what you need to know about the average life span of some of the most important parts in your car:

Engine

There is no other part in your car that is more important than the engine. Many factors influence its life span, so it’s hard to put a concrete number of miles or years on how long it will last. Typically, engines last around 150,000 miles on the low end and up to 350,000 on the high end.

How long your engine lasts depends in large part on how well it is maintained. Your engine needs fresh fluids, good exhaust and clean filters to work well. If any of these things are neglected, your engine will have to work harder, and its life span will be shortened.

The life span of your engine will also depend on how much abuse it takes. If you two heavy loads, regularly drive at top speeds, brake too quickly, rev the engine too much, or accelerate too quickly too often, you will shorten the life span of your engine.

Finally, how well the engine is made will influence how long it lasts. Generally speaking, engines made of iron are more durable than those made of aluminum. However, iron and steel are also heavier materials than aluminum, which will reduce the fuel efficiency. You should look for a balance of materials that will make the engine durable while also protecting your fuel efficiency.

Timing Belt

The timing belt is an important part of the engine. It ensures that the camshaft and crankshaft rotate in the right timing to move the pistons and valves in sync. If the timing belt fails, these parts could fire into each other, causing the engine to seize and requiring that you replace the whole engine.

The timing belt breaks down over time as the rubber decomposes. You can’t do anything to prevent this from happening. However, you can save yourself some money by replacing the timing belt on the recommended schedule. If you wait until the timing belt breaks, you will have to pay more. The engine may also become damaged, and that will cost you even more.

Starter

The starter is responsible for helping the engine start up when you turn over the ignition. How long a starter lasts varies wildly. However, a starter should last as long as the car itself if you maintain it well.

To prolong the life of the starter, you should keep your car tuned up. If the spark plugs fail, you will have to crank your car more before it will start. This will wear down the starter faster. However, if the spark plugs are healthy and the engine is healthy, your car should start right up and your starter should last a long time.

Alternator

The alternator recharges the battery using power from your car’s engine. When it fails, you’ll hear a clicking when you turn the ignition rather than the roar of the engine. At first, you may think that your battery has died. However, charging your battery won’t let you start up the car.

An alternator can last between 40,000 miles and 100,000 miles, but the life span depends upon how many electrical components are in your car and how hard you run the car. It’s best to have the health of your alternator measured when you bring your car in for maintenance. You can then replace it before it breaks down, leaving you stranded on the side of the road.

Brake Pads

Brake pads are an important car component. Healthy brake pads ensure that you can stop quickly in an emergency. Without healthy brake pads, you increase your risk of getting into an accident. Thinning brake pads also put your brake rotors and other wheel components in jeopardy. It’s better to replace your brake pads on time than to have to replace these other parts, which will cost you much more money.

Typically, brake pads last between 30,000 miles and 70,000 miles. There is great variability in the life span based on a number of factors.

If you brake hard and quickly too often, you will wear your brake pads down more quickly. If you drive in extreme climates such as in very hot temperatures or on muddy or rocky terrain, your will wear your brake pads down more quickly.

The quality of the brake pads also has a big influence on their life span. Of course, higher-quality brake pads will last much longer than inexpensive, low-quality brake pads.